Monday, March 30, 2009

Seaside Sketches


Hi again! Today I'm posting a card I made using Seaside Sketches by Stampin Up. I was soooo sad to see them retire this set. It's so pretty and versatile. I used the boy image on watercolor paper, and mirror stamped it, in order to make it look like his reflection. I'm going to explain how to stamp a mirror image. I bought a blank piece of rubber, with no image on it, that I use solely for mirror images.
All you have to do to is simply stamp your image on the piece of blank rubber. Then take the image you just stamped onto the rubber and stamp it a little bit below your original image. That's it! It's very simple. If it's clear as mud, just email me and I'll explain it to you one on one.

Ok...so far, I've stamped my image and my mirror image reflection onto watercolor paper. I absolutely love to color with Stampin Up's Watercolor Crayons and an Aquabrush. They are so easy to work with and the colors are just so rich. I love it! It's really fun to do! I used Creamy Caramel, Sage Shadow, Chocolate Chip, Taken With Teal, Close To Cocoa, and Rose Red. I set that aside to dry. I used Always Artichoke for my base card. for the front I stamped the Paisley Background stamp in Always Artichoke ink. My next layer is smaller and again I used the Always Artichoke. Then a layer of Chocolate Chip, with a torn bottom edge. I love that look! I added a copper brad in the left corner of that layer. Then I put my water color image on top, and taaaaaaa daaaaaaaaaaa! Finished! I like how it turned out, do you?

Thanks so very much for stopping by, please leave a comment and let me know what you think of this card. I really enjoy reading your comments and it always, always makes my day!! Take Care!

Happy Stampin,

Sunday, March 29, 2009

Butterflies of Happiness Birthday Card


Hiiii! Thanks so much for stopping in. This is a card I made for a very, very special friend, whose birthday was the day after mine. I didn't want to post this until I was sure she had recieved it by mail. She just loves butterflies and I hope this card made her day a little bit more special.

I decided to use a retired stamp set from Stampin Up's 2006 Winter Mini Catalog. It's called Butterflies of Happiness. I used one of the older techniques, "Sectioned Retiform" from the Technique Junkies Newsletter, the August/September 2004 issue. I hadn't done this technique in a long time, so it was fun,(and trying) to do it again! LOL It took me some time, but I really loved the results and I know She'll be thrilled with it! For the middle butterfly, I stamped it in Elegant Eggplant, Not Quite Navy, and Sage Shadow ink on vellum. I used a reserved amount of Dazzling Diamonds on the butterfly because I wanted the butterfly to be more noticeable than the glitter, if you know what I mean. I pop-dotted it, so it would be dimensional on the front of the card.

Thanks so much for stopping by! Please leave me a comment and let me know you were here. It always, always makes my day, to hear from my readers. You are why I do this! And I do love sharing with you. Stop by again, soon. I hope you get a chance to stamp today!

Stamping Hugs,

Thursday, March 26, 2009

Twin baby girl card


Hi All,
I hope everyone is having a super day! A friend of mine asked me to make her a Twin Baby Girls card for her friend who had just had twins. I was working on it, and I got up to tend to a roast I had in the crock pot. I had my mind on that card and what I was going to do next, and I walked over to the crock pot, grabbed the glass cover with my bare hands and OMG!!! OUCHHHHHHHHHHHHHHHHHHHHHHHHH!!! I ended up with a horrible burn on my index finger and get this...on the underside of my thumb and palm. As we use to say when I was little "OUCHY KA WOW WOW!! hehe It did not take me long to forget my card and get let of that cover. Geesch!!!! Soooooo, I went back to card making and needless to say, it took me all night!! Silly woman!!!That's what pot holders are for!!!

Okie, back to this card. Do you like it? What do you think of it? For some reason I knew what I wanted, but I had a hard time getting it to work for me. I started with Stampin Up's Pink Piroette cardstock. I folded it into a quarter fold A-2 size card. Then I cut a piece of cardstock for my next layer, from a Nursery Mat-Pack I picked up last summer in JoAnns. You can't really tell in the pic, but the lines on the first layer are glittery and opalesscent. I thought it was pretty. Then I made a smaller layer in Pink Piro. Then I took a diecut that was a double crib. I loved it, so cute. It had little bows on the corner posts of the crib, so I put a teeny tiny pearl in the center of each bow. I felt like the empty pink space around the crib needed something. I didn't realize I had gotten pink ink on my finger & the next thing I knew, YUCK-O! All over my little empty pink space...arghhhhhhhhhh!
Soooooooooo I took the little pink lines and made tiny hand drawn hearts out of them. LOL It's not really what I had intended to do, but us stampers know that there's no such thing as a "mistake" in stamping. LOL We just stamp over it or...
make little pink hearts. hehe Ok, next I added a small white rectangle to the bottom left of the pink layer and I stamped "congratulations" on it. I then took sweet pink & white gingham ribbon & wrapped it around the 2nd & 3rd layer, went around one more time and criss-crossed it in the front and tied a bow. I set that aside.

The next thing I did was take a 1/4" paper punch and punched 5 holes out of pink, blue and yellow paper. I took some very, very, very thin silver wire & made teeny tiny jump rings and attached them to the 5 paper hole punches, and slid them onto a safety pin. I wrote on the circles "T W I N S" and attached the safety pin to the ribbon.

To me, the bottom of the card had lots going on, but the top had very little. I took the Round Tab punch and punch a tab out of Pink Piro and I took the Word Window Punch and punched Whisper White. I wrote "Tickled Pink" in Pink Passion then took the White Gel pen and made white dots on the Round Tab. I used some glue to glue them together, then I put 2 small white polka-dotted pink brads in the word window, and wrote X2 on the round tab. I attached them to the top of the card with pop dots for dimension and then, I put a sentiment inside... wa-laaaaaaaaa! Finished!

I really wish I had used just regular card stock for the first layer. Although it's babyish and I love the glitter, it is quite bulky and doesn't lay as well as it should. I'm happy with this one, but if I did it again, I would use something lighter, for a more delicate look.

I hope you like it and can use it for inspiration sometime. Thanks so much for taking the time to stop in, I really appreciate it. Please leave a comment and tell me what you think of it, hearing from you guys always makes my day. Take care and
have a great rest of the week. Hopefully you can get a little creative stamping time in!!

Stampin hugs,


Pocket Slide Card


Firstly, I'd like to apologize for not posting in a week. That's bad, and I know it.
I hate to repeat myself, but I am soooo tired all the time, it's hard to get motivated to do anything. Isn't that awful? I try to push myself, but sometimes...I just tell myself to be quiet and stop pushing. LOL I've been so concerned that my FM was keeping me from getting good sleep. So I told the Dr. again that I couldn't go on like this much longer. To my surprise, she finally agreed with me and is setting me up with a CPAP machine, so I can get some decent sleep. She said it should make such a difference in the way I feel. I sure hope she's right...I can't stand to get much more fatigued than this. I'm looking forward to getting the machine, I think I have forgotten what "normal" feels like. I sure would love to feel normal again, and be able to stamp whenever I feel like it! Anyhooooo, I wandered...back to the card, Ret...

This is a card I made for a friend. I felt like doing something different, so I made a pocket slide card. The burgandy is the pocket and the card just slides into it. I made an A-2 card out of Mellow moss & cut it in half. I made a wrap for the card out of the burgandy. (I told you it was different!! Maybe you can help me...for the life of me, I can not remember the name of the Stampin Up set I used. LOL and I've been way too lazy to dig thru my stamps again to get the title. See all the faith I have in you?!! I know you'll help me!! hehe

When she gets this card, she'll probably think I've flipped, the green just slides right out of the burgandy & I wrote my sentiment & note right on there. Tricky, huh?
LOL

Thanks so much for taking the time to stop by. I hope I inspired you to try something different today when making a card. You never know where our imagination will take us!!! Have fun!!

Happy Stampin,

Wednesday, March 18, 2009

Another Year


Happy Birthday to Me! Another year older!! I think they say another year older and another year wiser. I don't know about the wiser...hehe I had a very nice day, it was a beautiful day out, sunny and sweater weather. I took off and went to Halifax to the Local Scrapbooking Stores. I did alot of window shopping, and alot of the things from CHA had started coming in, so it was really fun to see all the neat new stuff. I picked up some of the new Basic Grey Marakech & Porcelin papers. They are so pretty, and something fresh and new to play with. I was pleased with my purchase!

I came home and had some birthday calls from my Mom and family and friends in NY, so that was great! Scotty came home with a little cute birthday cake, I was really surprised!!! All in all it was a fantastic day!!

Maybe tomorrow I'll have a stampin day!! I hope everyone is doing well and has had a good week so far!!

hugs,


Tuesday, March 17, 2009

Monday, March 16, 2009

I'm sorry this photgraphed so poorly :(


Hi Everyone,
I sure hope everybody had a good day today! One of my best friends just
had a birthday and I made this card for her. You may recognize the layout I used, as it's from last Mondays "MOJO MONDAY" Challenge. I loved the layout and wanted to do it, but I didn't get it done for that particular week, lol. Have you ever gotten ready to stamp just to get stuck on your design? Do try MOJO MONDAY, it really helps to get your mojo going! hehe

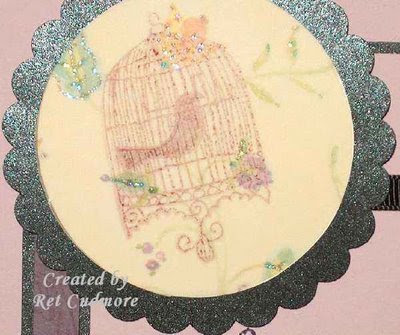
I really love this bird cage stamp set by Basic Grey. Its part of the Porcelain - Clear Stamp Aviary collection. I'm quite disappointed in the way this photographed, but there's not a whole lot I can do about that! Most of the items I used are from Stampin Up, with the exception of the black shiny paper and the stamp set.

The finished card size is a 5 1/2" X 5 1/2" square. I used two main colors card stock, Perfect Plum and Pale Plum. On the Perfect Plum Square I stamped the background stamp "Bella Toile" in Perfect Plum ink. I cut all the c/s squares for layers and then I took a sheet of this scrumptious shiny paper that I had in my stash. I don't know who it's made by, but it sure is pretty! I cut my shiny black squares out and layered all of the squares together and I set them aside. The next thing I did was cut a circle out of Whisper White card stock and a piece of translucent light green vellum with a vine and glittery designs on it that was on my desk. I layered them together and stamped the bird cage on it, being careful not to let the stamp slide on the vellum. I stamped the little bird as well, and set aside. The next thing I did was to use my Marvy Giga Scallop Circle Punch on the shiny black paper. I layered the bird cage circles and the scallop together. I added four black mini brads to the right side of my bottom layer. I then positioned the top square layer onto the bottom one. I taped them together and added a piece of 1/4" black grosgrain ribbon. I added the layers to my card, then I took the scallop layer and positioned it to the left side of the card and voila, all finished.

As I said, I really love the bird cages in this set, and I'm not normally a bird cage person!! hehe I hope you like this, and as always, thanks so much for stopping by. For those of you who write comments, THANK YOU so much for taking the time to write to me, you all definitely make my day!!!

Have a great week and Happy Stamping,

Thursday, March 12, 2009

Natural Beauty


Hi Everyone,
Tonight I'm posting a card that's a little different. All products I used for this are Stampin Up. I wanted to do something different so I shaped the left side of the card as a flap with the right side of it in the shape of a half circle and it tucks under the flower to close.

I made 3 circles, each in different sizes for layering, 1 Bashful Blue, 1 in Mellow Moss, and one in Very Vanilla. I stamped the bird image in basic black, then stamped the bird on a post-it note mask and placed over the bird on the vanilla circle. Next, I stamped the word image in basic black on top of the mask, lifted the mask and waaaa-laaa, done! I colored in the image and layered the circles together and set them aside. Then, I took my Mat Pack and pierced along the right side of the brown circle flap. I adhered my circles to the brown flap and with the white gel pen, I added dots to add depth. On the right sided flap, I used the Slit Punch, added white dots and a flower with an orange brad that I had hanging around.

I then added a strip of Blue to the right side of the card after I pierced it. I added a greeting inside and that completed this card. I hope you like it. If you have any questions, feel free to email me. I hope you all have a wonderful Friday!

Take care and happy stamping!

Tuesday, March 3, 2009

Serene Spring


We need Spring! Atleast, I need spring and spring doesn't seem to want to come, so I thought I'd atleast "stamp spring"! heeee! It did help, for a few minutes! lol

This A-2 size card is made from the Stampin Up "Serene Spring" stamp set. My card base is Very Vanilla, I stamped the background onto Kiwi Kiss with the Bella Toile background stamp in SU Chocolate Chip ink. I cut a piece of Very Vanilla to use as as another layer under the image and stamped it with the SU Scallop Punch. The verse from this set is stamped in Chocolate Chip. I did a straight line of piercing across the top of this ivory layer and did some "faux stitching" with the SU Chocolate Chip marker. Next, I pierced in scallop to add a little dimension. I wrapped a piece of 1/4" Chocolate Chip Grosgrain ribbon around it.

I stamped my main image in Stazon Black ink onto a small piece of Stampin Up Watercolor Paper. I then colored in the image with my SU Watercolor Crayons. I just love those crayons!! The colors are so beautiful and the crayons last a long, long time. I stamped the flower pot twice and cut out the flowers, so I could use dimensionals to raise the flowers so they look 3-D. If you look closely you can see that I added a little bit of Dazzlin Diamonds glitter to spruce it up a bit. I punched the watercolor paper with the SU Ticket Corner punch in the upper right corner. I then layered the image onto a piece of Riding Hood Red cardstock.

I put all my layers together and viola, "Serene Spring" for a day!!! I'm happy with the way it turned out. I hope you like it, too.

Thanks so much for dropping by. I appreciate your comments, they make my day!!!!

Happy Stampin'